The Ultimate Guide To Drywall Repair Jackson
Drywall Repair Jackson - An Overview
Table of ContentsSome Of Drywall Repair JacksonIndicators on Drywall Repair Jackson You Should KnowThe Buzz on Drywall Repair JacksonDrywall Repair Jackson Fundamentals ExplainedRumored Buzz on Drywall Repair JacksonThe Best Guide To Drywall Repair Jackson
Then you'll reduce an additional item and also repeat the procedure until you lastly determine just how to place a screw between to hold it in area up until you can attach the board to the existing wall. Next off, you will screw a patch to the center of the board. Which has a 50/50 possibility of pressing the board right into the wall, tearing the screws with, and also dropping right into the tooth cavity.The fixing kits are much more costly, especially when you have numerous openings to spot. Making a drywall California spot, on the various other hand, needs no support, no screws, and also no tape.
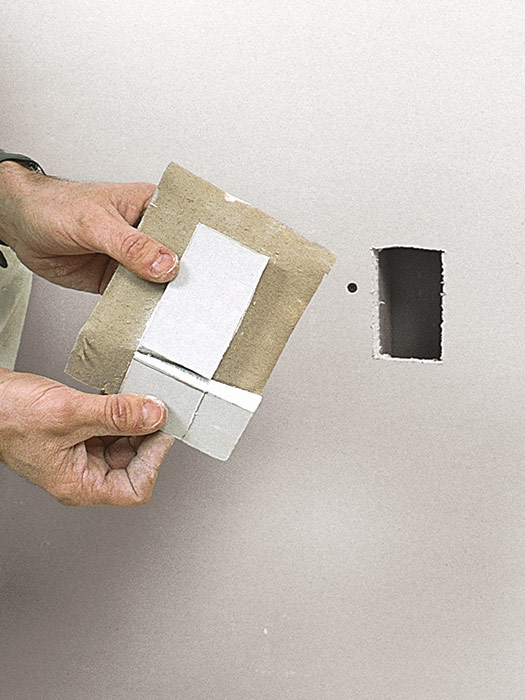
They are held in location by leaving the facing paper larger than the opening to serve as built-in joint tape. The benefits of making use of a The golden state patch for drywall repairs are that they are more affordable, are fully personalized to whatever dimensions you need, and also are quicker than taping. You can additionally use a various thickness of drywall.
Another plus is that the drywall paper is thinner than a lot of joint tape, making it simpler to drift out. Just a hole in the wall surface. It's a long tale including prospectors misunderstanding the term "sheetrock" as well as where the term hole-in-the-wall came from Not truly. The fact is, it probably started in The golden state.
Indicators on Drywall Repair Jackson You Need To Know
This is mostly for smaller sized openings to fix, in the array of 6"x6". The bigger the spot, the simpler it is to fall into or out of the opening.
It's much less complicated to begin with something square than to attempt to shape the repair piece to fit. Gauging the size of the hole, concerning 1" larger all the way around.
Marking the elevation. Once more about 1" past the intermediary. Patch was gauged and also noted concerning 2" larger and 2" taller than the intermediary. The first patch is currently prepared to mark the behind. Action 3: Flip the scrap item upside down and also center it under the opening. Mark the inside measurements for your vertical cuts.
Unknown Facts About Drywall Repair Jackson
Marking the height of the intermediary onto the back of the drywall patch. Step 5: Square up and also rack up the back side of the drywall.
Tip 8: Carefully roll the snapped item by pulling your fingers in as well as pushing your thumbs out as well as away. It's easiest if you relax the opposite side on a strong surface. Peeling the snapped item from the front paper Step 9: As you roll the item, it separates from the front paper beginning at the scored edge and taking out.
You ought to have a fixing item with one floppy item of paper hanging off. The initial edge peeled off. Action 10: Repeat steps 6-9 for each side.
Beginning with the shortest sides first. Peeling off the other sides. Draw from the scored side to the beyond the spot. Action 11: You need to be entrusted a drywall plug surrounded by loose paper. Tidy off any residual gypsum on the paper. You'll need this to lay flat on the wall and any type of crumbs will make that difficult.
10 Simple Techniques For Drywall Repair Jackson
Pro Tip: You do not wish to exhaust the paper. It will wish to tear earlier rather than later on. Ok, so we have those information exercised. Maintain those in mind as we go via these actions of setup. Step 1: Blend some hot mud. We like hot mud here due to the fact that it dries out quicker, doesn't shrink as much, and also has great adhesive high qualities.
Action 2: Make a mud bed around the hole. Be certain to scratch some around the side to load the voids. Scape mud around the opening and make sure to get some inside. This will certainly be Our site your adhesive as well as will shim any type of spaces. Action 3: Now take some mud and also smear it on the backside of the California spot.
We call it back buttering, but it's more like cream cheese. You can never have as well much lotion cheese. Butter the rear of the spot. Notice all of the edges have lots of excess mud. Step 4: Position the drywall spot into the hole. The paper should currently be hing on the bed of mud.
The smart Trick of Drywall Repair Jackson That Nobody is Discussing
Step 8: Delicately roll the snapped piece by pulling your fingers in and pressing your thumbs out and away. It's simplest if you relax the opposite side on a strong surface. Peeling off the snapped piece from the front paper Action 9: As you roll the item, it separates from the front paper starting at the racked up side as well as pulling out.
You should have a repair work piece with one floppy paper hanging off. The initial side removed. Action 10: Repeat actions 6-9 for each and every side. Pointer: begin with your quickest item. The smaller sized the piece the extra challenging it is to break off. And the even more you snap off the smaller the remaining items are.
Beginning with the shortest edges initially. Peeling off the various other edges. Draw from the racked up edge to the exterior of the patch. Action 11: You must be entrusted to a drywall plug surrounded by loose paper. Wipe any residual plaster on the paper. You'll need this to lay flat on the wall as well as any crumbs will certainly make that moved here impossible.
Below are a pair of points to take note of: You want your spot to be as near to purge with the wall as you can. You want to load the voids around the spot, but not so much that the mud drops right into the dental caries.
The 30-Second Trick For Drywall Repair Jackson
Pro Pointer: You do not intend to strain the paper. It will desire to rip quicker instead of later. Ok, so we have those details exercised. Keep More Bonuses those in mind as we experience these actions of setup - Drywall Repair Jackson. Step 1: Blend some warm mud. We prefer hot mud right here because it dries out much faster, does not diminish as a lot, and also has terrific glue high qualities.
Step 2: Make a mud bed around the hole. Make sure to scuff some around the side to load the spaces. Scape mud around the opening and see to it to obtain some inside. This will be your glue and will certainly shim any type of gaps. Step 3: Now take some mud as well as smear it on the behind of the California patch.
